[googlemaps https://mapsengine.google.com/map/embed?mid=zPbsJYJWxk3s.kLMwberwzvPo&w=640&h=480]
For several years I’ve asked students in my digital journalism classes to do a group project involving Google Maps. It’s a pretty simple assignment. They go out and write reviews for their blogs about coffee shops near Northeastern, or pizza restaurants, or whatever we’ve all agreed to. Then they plot the location on a map and include a link to their review. The idea is to introduce them to the power of mapping and how it can be used as a tool for non-linear storytelling.
Recently I was faced with the prospect of using the new Google Maps, which struck me as significantly more cumbersome than the old version. I couldn’t find much in the way of good documentation online, so I put out a call on Twitter. That brought a response from Aleszu Bajak, the editor of StoryBench, a how-they-did-it site that’s part of our School of Journalism’s Media Innovation graduate program. Yes, Alezsu was probably within shouting distance when he replied to my tweet.
https://twitter.com/aleszubajak/status/532645402299080704
At first I was bewildered. But later on, it started to sink in. And I’m here to tell you that the new Google Maps is a terrific tool — better than the old one, though it seems to be missing a few features. What follows is a look at how we did our most recent project — a guide to Boston’s “Hidden Gems.” (The story has been picked up by Universal Hub.) I’ve written a how-to post designed for people like me, not for Google experts. So if you’d like to give it a try, please have a look. Instructions after the jump. (And here is Bajak’s own post on Google Maps.)
I started off by asking my students to write their reviews and post them on their blogs, and to include a few photos. One of those photos, I told them, had to serve as some sort of signifier for the business, such as the front entrance along with a sign. The rest could be more creative. Here is an example of one of those reviews.
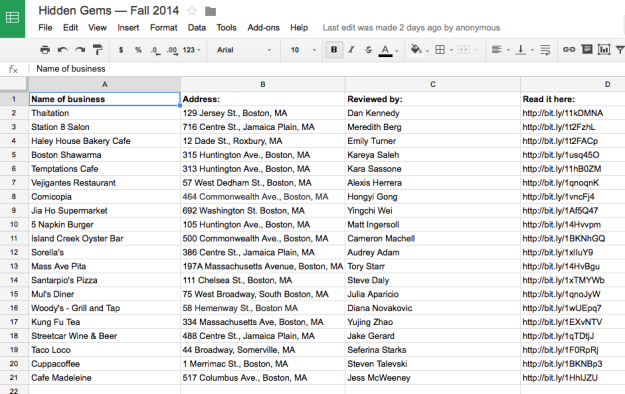
When they showed up to class, I shared with them a link to a spreadsheet I had already set up in Google Drive. I changed the settings so that anyone with the link could edit it and had them enter their data. (I’ve since changed it back to view-only.)

I had already set up the spreadsheet with the column headers, which, with the exception of “Name of business,” will appear in the map. I also had them use the link-shortener Bit.ly for their reviews. After doing a little testing before class, I had them include the “http” prefix. Google Maps automatically detects some URLs and makes them clickable, but with Bit.ly you need to include the prefix. Also: Make sure that the URL in the spreadsheet is not a clickable link. If it is, Google Maps won’t be able to read it.
To repeat, this time a little more simply: Include “http” on the spreadsheet so that Google Maps will recognize it as a clickable link. But if it’s blue and underlined on the spreadsheet, make sure you remove the underlying link; otherwise it won’t be readable in Google Maps.
(Also, note that a review of Thaitation that I wrote several years ago appears atop the spreadsheet. I did that for demonstration purposes but deleted it from the final map.)
My next step was to share a map I had created ahead of time. Simply go to Google Maps, click on “My Maps,” then click on “Create.” Next, click on “Untitled Map” in the upper left. You’ll then be able to enter a title and a description. Next, change the sharing options (upper right) so that anyone with the link can edit it.
One of the features that makes the new Google Maps different from the old is that you do most of your work by pulling in the data from your spreadsheet(s). That means not everyone has to mess around with the map itself. Since I wanted them to anyway, I came up with a final step, which I’ll describe later on. But first, let’s deal with getting the spreadsheet data plotted on our map. Make sure your browser allows pop-ups. In Safari, it’s Preferences > Security > Block pop-up windows. Make sure that’s unchecked.
 Next: Look at the box in the upper left corner of the map. “Base map” controls the overall design of your map. I happen to like the default, but play around. You want to add a layer. You don’t need to click “Add layer” if you see the “Untitled layer” box. Click on “Import.” Choose “Google Drive.” And select the correct spreadsheet. Click “Select.” If you forgot to enable pop-ups, you’ll be prompted.
Here is where Google Maps is actually fun to use. By making just a few choices, a map will be created before your eyes. Click on “Address:” first, because that’s the information needed to plot each marker on the map. Then click “Continue.” Select “Name of business,” which is what will be inserted atop each text box when your users click on a point on the map. Click “Finish” and watch what happens. Not only is your map automatically created, but if you had a wide view before (perhaps the United States, or even the entire world), it will now zoom in on just your map markers.
At this point you could pronounce yourself finished, or add layers, use different color coding, etc. Explore. Do some troubleshooting. (Even though East Boston is part of Boston, one student found that Santarpio’s didn’t show up in the right place until we tweaked the spreadsheet so that the address field specified East Boston. Note that whenever you make a change to the spreadsheet, you’ll have to delete the layer and do it again — a very fast and simple process.) But because I wanted my students to lay hands on the actual map, I added one more step — inserting photos into their text boxes.
I had each of my students click on the marker for her or his review. Click on the pencil. Click on the camera. Choose “Image URL.” Open up another tab on your browser and select a photo that is already online. In this case, I asked my students to select the overall shot I had asked them to include in their reviews. You need to get the URL for the photo. In Safari, place your cursor over the image, hold down the control key and select “Copy image address.” Return to the previous tab. Paste the URL into the proper place as directed. Click “Select,” then click “Save.” Google takes care of the rest.
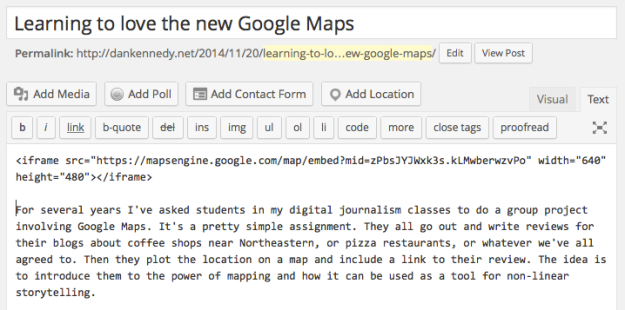
Now for the final step: embedding the map on your website, as I have done above. If you are done, go back to the “Share” button and make your map “Public on the web.” You might also want to change it so that anyone can view but not edit the map so as to eliminate the possibility of vandalism. Click on the folder icon in the box in the upper left and select “Embed on my site.” You’ll see some coding language that begins and ends with “iframe”. Copy it.
All my websites, including this blog, are built in WordPress. The editing box gives you two choices: “Visual” and “Text.” Visual is a what-you-see-is-more-or-less-what-you-get environment, and it’s what we work with most of the time. Text shows some of the underlying code. Toggle over to Text, then paste the code you just copied. That’s all there is to it. You can save the draft and preview it, and then go ahead and publish it when you you’re happy with it.
As with most how-to guides, it’s a lot easier to do it than it is to describe it. I have to say that I miss some features in the old Google Maps, such as the ability to include embedded links and to insert photos at any size I want. But I love pulling in the content from a spreadsheet, since it allows me to set it up as structured data — important when working on a group project.
I’m only scratching the surface of what Google Maps can do. One thing I especially like about the new version is that it serves as an introduction to the way Google Fusion Tables works. That is a far more complex tool that lets you combine mapping and data analysis. I also like getting across the idea that journalism can be something very different from an article or a photo story or a video.
Discover more from Media Nation
Subscribe to get the latest posts sent to your email.


I’ve found the new Google Maps almost unusable for what I want. There are features either missing moved so deep that I can’t find them.
However, Dan, what I like to see is that you can now link spreadsheets with maps (that wasn’t possible before). I’ve worked with maps and Fusion Tables, which can be cumbersome for smaller projects.
So, it looks like it’s big ups for data and maps, but thumbs down for the user interface, IMO.
Alternatively, just use Bing Maps